Cómo crear tu propio GPT: una guía paso a paso
Si quieres saber cómo crear tu propio asistente virtual utilizando ChatGPT, estás de suerte, en este artículo te contamos cómo crear tu propio GPT personalizado en tan solo unos minutos.
Con la llegada de los GPT personalizables de OpenAI, los usuarios tienen la capacidad de adaptar el popular chatbot de inteligencia artificial, ChatGPT, para realizar tareas específicas.
Ya no estás limitado a utilizar la versión genérica; ahora puedes crear un asistente virtual que se ajuste perfectamente a tus necesidades, ya sea para programación, escritura creativa, soporte técnico, ¡o incluso para ayudarte con la redacción de copies respetando el tono de tu marca o negocio!
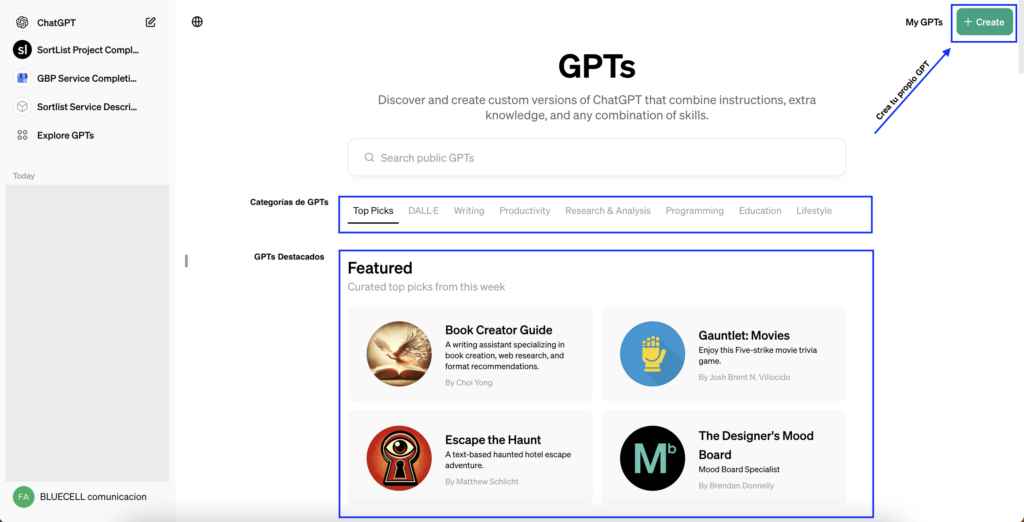
Paso 1: Accede a ChatGPT y selecciona “Explorar”
Lo primero que debes hacer es acceder a la plataforma de ChatGPT y dirigirte a la opción “Explorar” en la barra lateral izquierda. Este es el punto de partida para crear tu propio ChatGPT personalizado.

Paso 2: Comienza a crear tu GPT
Una vez dentro de la sección de exploración, podrás ver diferentes GPTs ya creados, tanto por OpenAI como por usuarios de la comunidad. Los GPTs están divididos por categorías y caso de uso. Podrás seleccionar GPTs personalizados para creación de imágenes, interpretación de código ¡y mucho más!
Pero en este caso lo que nos interesa es crear un GPT propio que represente nuestra marca o negocio, por lo tanto, haremos click en “Create”.
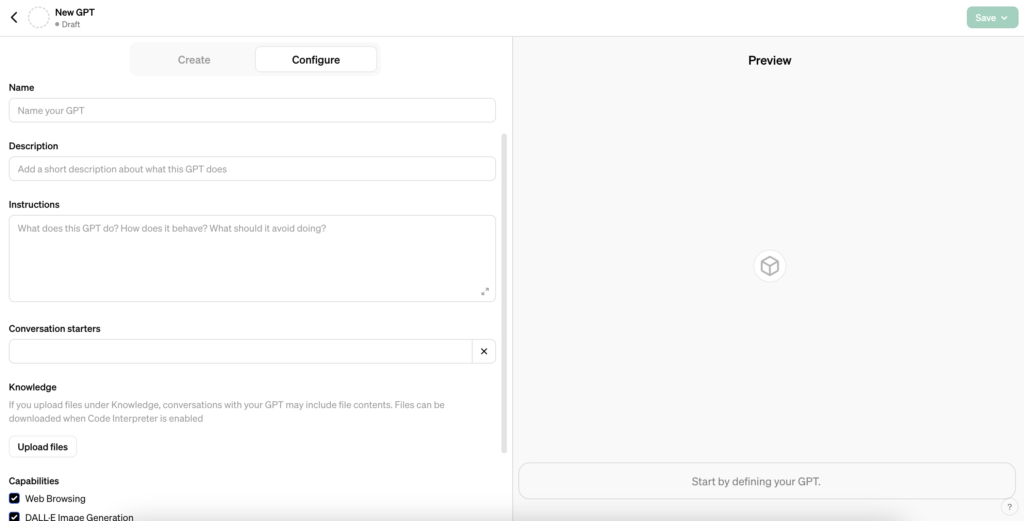
Paso 3: Personalizando tu GPT
¡Ahora comienza lo divertido! Una vez que hayas seleccionado la opción de Crear un nuevo GPT, verás una nueva pantalla dividida en dos secciones. Por un lado, tendrás la sección de “Configure”, donde podrás especificar las instrucciones para tu GPT.
En la sección de instrucciones podrás definir el tono de la conversación del bot, el rol y cualquier otro aspecto importante para que tu GPT funcione exactamente como deseas. Además, también podrás seleccionar los módulos que deseas que formen parte del BOT, como la búsqueda en internet, la interpretación de código o la generación de imágenes con la tecnología de DALL·E.
Además, en la sección de “Knowledge”, tendrás la opción de añadir archivos de texto, bases de datos o documentos que puedan complementar la información o base de conocimientos de tu BOT. Esto te permitirá personalizar aún más la experiencia, asegurando que tu GPT pueda responder de manera más precisa y detallada, basándose en un conjunto de datos específicos y relevantes para tus necesidades.
Paso 4: Prueba y ajusta
Una vez completado el proceso de creación, llega el momento de probar tu ChatGPT personalizado. Interactúa con él haciéndole preguntas y solicitando su ayuda en diferentes tareas. A medida que interactúas, podrás ajustar su comportamiento y mejorar su rendimiento.
Si te interesa llevar tu negocio o proyecto al siguiente nivel con un asistente virtual personalizado, en Bluecell somos expertos en inteligencia artificial y desarrollo de GPTs personalizados.
Nuestra experiencia y conocimiento nos permiten ofrecerte soluciones a medida que se adaptan perfectamente a tus necesidades específicas. No dejes pasar la oportunidad de innovar y destacar en tu sector.
Contáctanos hoy mismo y comienza a transformar la forma en que interactúas con tus clientes y gestionas tus tareas diarias con la ayuda de la inteligencia artificial más avanzada. ¡En Bluecell, estamos aquí para ayudarte a crear el futuro!